Simple Boolean Subtraction (3)


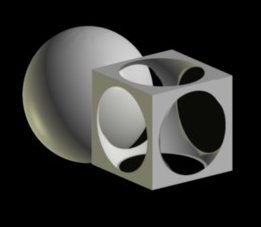
Exhibit B is a Boolean obtained subtracting a sphere from a cube. (Download the project file- 13KB)
  1. Make a cube, double-click it and enter size 60 for each axe. Make a sphere, double-click it and enter 80 for the radius. Right-click the cube to have both objects selected, then do Edit->Locate->Center About Origin. Do Build->Convert to Mesh. Select only the sphere, Build->Convert to Subdivided. Double-click the subdivision sphere and enter 3 for working divisions. This does a very smooth sphere in the workspace, what we’ll appreciate for making the maps!
  2. Apply the “black” material created previously on the sphere and the “white” material on the cube.
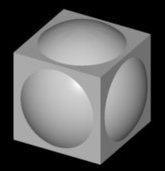

Exhibit B operands
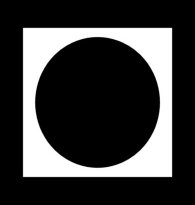
  1. In the same way as we did for Exhibit A, zoom the image and make a preview render (600 x 450, antialiased, default gray background). Save the image as front_gray. Make a new render making this time the background black. Save as front_black. I’ll explain later why we need this renders. From now on you must not change the objects’ relative position!
  2. Open front_black in a paint editor and select the exact margins of the white square. Save the selection (name it “hole”), this will be the transparency map for the faces of the cube.


frontmap

  1. We shall do now a transparency map for the sphere in order to hide those parts of it, which exceed the cube! We are going to do a planar mapping of the sphere, so we will project a square shaped map on the whole sphere at once. This means that the map, which will be obtained from the rendered image, should have the size equal with the diameter of the sphere. Let’s do now the map! Open in the paint editor front_gray. Make a square selection of the sphere, that means the selection box has to be tangent to the image of the
sphere (not to the central hole!). This is very important, so take your time to do it right! You may have to zoom in and write down the top – bottom– left – right coordinates of the image of the sphere in order to make a correct selection. More versatile paint programs can do automatically the selection based on color or brightness. If you can reproduce the selection, go to the other image, front_black (having the same level of zoom) and apply the selection set up previously. Save this selection as “frontmap” (your transparency map for the sphere); it should look like this image (upper-left). Now the promised explanation: the render with gray background was needed to know the margins of the sphere, while the black background overcomes the inevitable mapping errors. Think of this: if a few rebellious gray pixels remain tangent to the image of the sphere, the corresponding area won’t be completely transparent, generating ugly artifacts.
6. Make a new material, name it “cubeface”. Leave the default settings, but add the transparency map, which we called “hole”, like you did it for Exhibit A (Textures->Trans: etc.). Now the UV mapping: First hide the sphere. Then, in Front view, Point Edit mode, Face Select mode, select the front face of the cube. With Arc Rotate on, turn the view 180 degrees, Arc Rotate off, right click the cube. Now both the front face and the opposite face are selected. Click View->Front to restore the view. Apply the “cubeface” material on the selected faces. Hit Texture UV. Click the Select arrow, and then click away in the workspace to deselect. Turn to Side view and repeat the mapping just as you did for front view: select side face and its opposite, restore Side view, apply “cubeface”, click Texture UV, Select arrow, deselect. Turn to Top view and repeat the procedure. As a result, all six faces of the cube should be mapped for transparency. Leave Point Edit mode and check with an Ortho view render that you did it right! You should obtain an image like this (on the right):


mapped cube


mapped sphere

6. In Front view click the cube to select it, do Edit->Show All to bring back the sphere and Edit->Hide to hide the selected cube. Make a new material called “sphere”. Enter 0 for the specular component and add the transparency map called “frontmap” like you did it above. Click OK to close the material editor. Click the sphere to select it (you are in normal Edit mode), apply the “sphere” material and click Texture UV. The yellow square of the UV tool should be tangent to the sphere. Click the select arrow. Check with an Ortho render that you did it well. You should obtain an image like this (on the left):
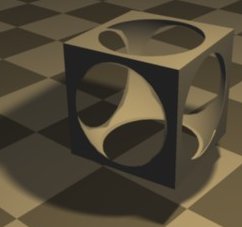
7. Do Edit->Show All, select both the sphere and the cube and do Build->Group. Your Boolean is ready for final rendering (left). As promised, there is no more limitation regarding the camera’s position. As any other Anim8or object with transparent materials, our Booleans suffer when render with shadows. Anim8or’s occluder makes no difference between transparent and opaque materials when casting shadows (on the right)


Can you push it back?


wrong shadow                 

On the next page, we’ll take a look at a basically more complex situation, with Exhibit C.

Previous           Next