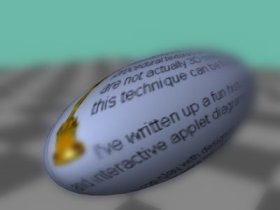
Still nature with ellipsoid and focal blur
Until Anim8or will have this feature, I suggest an extremely simple workaround with highly accurate results for still images:
Anybody, who has seen photos with a clearly exposed
main subject and blurred foreground and background, has a common understanding
of what focal blur is.
|
Still nature with ellipsoid and focal blur |
The 3D graphics programs, which have implemented this feature, use
the depth information (measured from the camera) for every pixel of the
image and apply blur according to how much the corresponding point of the
scene is out of focus (for a predefined focal length of the camera's objective).
The blur is done in the renderer by substituting each pixel with a weighed
average of itself and the neighbor pixels.
Until Anim8or will have this feature, I suggest an extremely simple workaround with highly accurate results for still images: |
The focal blur will be added as a post-production effect in an image
editor. I'll show the necessary steps using Paint Shop Pro 7, but most
other paint programs can be used as well, translating the methods accordingly.
Most image editors can apply some kind of blur (blur, softening, average)
over an entire image, or a selection of it. The user has to select the
area and the intensity of the blur effect which will be applied.
Anybody who ever tried to make focal blur, applying manually the blur,
knows how frustrating such an attempt is and even for the simplest images
the results are questionable. The main problems consist in determining
the amount of blur to be applied for different areas of the image in correlation
with their depth, to have a continuous variation of the effect and even
to make the area selections. Can't even think about more complex images...
The good news is that you can use masks. A mask is a grayscale image
applied over the processed image to protect parts of it from being modified.
It can cover an image with various levels of opacity, exposing the underlying
image more or less to the applied effect.
It is now clear that we have to create a mask containing the depth
information of our scene and let the image editor to apply the blur through
that mask. We need a depth map!
Here comes Anim8or with the solution: a height map is
a depth map! When measuring vertically we say height, but generally spoken
it is depth, starting from the camera. A few examples will show how simple
it is to make focal blur.
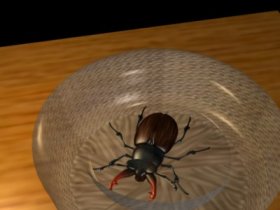
| Enough with the theory, let's start blurring! Below I've created very
simple scenes for demonstration purpose. The main actor, to delight the
eyes, is a bug downloaded from bobit's
site. Thanks, bobit!
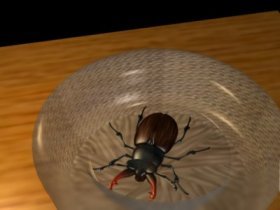
Do the following steps: 1. Make the final render of your scene
|
Final Anim8or render |
3. Make the necessary steps for a height map (see the first
part of the tutorial): make all objects in the scene perfect white,
make a black fog. This time stay in camera view!
| Set the Start and End values for the fog (make some trials) so
that to remain visible only that parts of the scene where you want to have
the foreground blur, then make a render (see the image on the right). This
is the mask for the foreground blur. The lighter the mask is, the more
blur will be applied, so the closest part to the camera will be the most
out of focus part.
4. Set the Start and End values so that to be immersed in fog only that parts of the scene where you want to have the background blur, then make a render (see below left). In the image editor make a negative of that image. This will be the mask for the background blur (below on the right). |
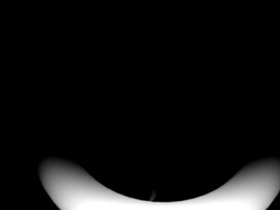
Foreground blur mask |

Depth map for the background |
Notice that the farther to the camera is, the lighter the mask is and accordingly, more blur will be applied to the image. |
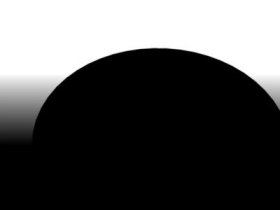
Background blur mask |
5. In Paint Shop Pro open your image to be blurred (the final Anim8or
render) and the foreground mask. Make sure your image is selected and click
Masks -> New -> From Image... In the "Add Mask From Image" dialog box select,
in "Source Window", the name of the foreground mask. In the "Create mask
from" area check "Source luminance" and hit OK (see the image below - left).
Click Selections -> From Mask (image below - right). Now apply the
blur clicking Effects -> Blur -> Blur More (you will apply that amount
of blur which you want). Click Masks -> Delete, then click " No" to the
question whether you want to merge the mask in the image. Click Selections
-> Select None.
Image with foreground luminance mask |
Now you are looking at the original image, but with foreground blur (image below). |
Selection made from mask |
| 6. Open in Paint Shop Pro the image intended to be the background mask. Select the foreground-blurred image and repeat step 5 using this time the background mask. You should increase the amount of blur for the background. Now, the image looks less computer-generated, with a subtle foreground and background blur. Look at the blurred image below, compared with the original render. |
Foreground-blurred image |

Focal-blurred image |
Original image |
(On the next page I'll release the bug in its natural habitat!)