|
Modeling an Eggplant: First Lesson in Anim8or |
![]() |
This
tutorial
describes how to make an Eggplant. It uses the technique of box
modeling but starts with a pentagon instead of a cube so that it
will
have 5-fold symmetry.
The basic idea is to model a very simple block figure that encloses the shape that you want to make. Then using surface subdivision and smoothing you can create smooth surfaces that follow almost any basic shape that you can imagine. You can control the sharpness of corners so that everything doesn't end up looking like PlaySkool toys. |
Start
in the
Object Editor. Use the View->Top command to switch to the top
view
so that it fills the screen. Select
Build->Primitives->N-Gon from
the menu and set the value to 5. Select Add Polygon ![]() |
![]() |
![]() ![]() |
You
should have
a nice thick base for your plant. If you switch to wire frame
mode,
you will notice that the top and bottom faces are not divided into
triangles,
but are left as single, 5-sided polygons. This allows the
extrusion
of the base into the stem to work. Note: If you have problems with the extrusion not working, you might not have been in the top view when you added the pentagon. Now you'll switch to point-edit mode ![]() ![]() |
To build the
"feet" of the
base, you will need to select thel 5 outer faces on the base and
extrude
them. Switch to face mode ![]() ![]() You will notice that some faces are yellow while others are blue. The yellow ones are facing towards the screen while the blue ones are facing the other way. This makes it easier to see what's what in wire frame views. |
![]() |
Now
click the
face extrude ![]() |
![]() |
Next
switch to
point-select ![]() ![]() |
![]() |
![]() |
Now extrude the top pentagon up 4 or 5 times, each about as high as the base is thick. This will form the stem. Then extrude again, but make this one a little less that half as thick. Scale the face out about 25%. Extrude a bit more, and scale back to the original size. These will form the base of the flower, and the sides of the top section will form the leaves that surround the egg. Your model should look similar to the one at the left. |
Now
select the
5 surrounding upper faces. You may need to switch between the
point-select
and drag-select tools, and switch views to get the right faces selected.
Once you have
then selected
as shown on the right, extrude them a small amount, scale them up until
they are close to touching, but not quite. Then use the face
rotate Next extrude them again, this time a bit more than the previous, and rotate the faces until they are facing even more vertically. One final extrude and you're finished with the basic shape for the eggplant! |
![]() ![]() ![]() |
![]() |
Before you
smooth your eggplant
into its final form there is one more thing that you can do control the
final form. It would be better if the bottom side of the base a
little
flatter than the top side. You can do this by setting how sharp
the
bottom edges should be.
First select all
of the bottom
most edges. Switch to the front view and to edge select |
Switch back to edit
mode in the object editor mode by clicking on the topmost arrow button
on the toolbar. It is easier to see what's happening if you view
your model in the faceted mode, so select the View->Preferences menu
item
and then select flat in the OpenGL area of the dialog that
appears.
Click OK.
Selet your model. Then select the Build->Subdivide menu item. Leave the tension value at the default 0 in the dialog that appears, and click OK. Then do the same thing again. Your model should look like that shown below! |
Notice the shape of the foot. The bottom edge is sharper than the top, but it isn't perfectly sharp. This gives the model a "bottom" side without going all the way to making a sharp crease, which wouldn't be very plant-like. | |
If you switch
back to a smooth
view, you might notice a few places near sharp curves where the model
appears
creased. You can smooth these places out by subdividing again but
this would increase the number of faces in the model by a factor of 4!
A better way is
to set the
model's smooth angle. The smooth angle is the threshold
Anim8or
uses to determine if adjacent faces should appear smooth or
creased.
Switch to point-select |
![]() ![]() |
![]() ![]() ![]() |
A straight stem
is pretty
boring. Using a couple of modifiers can really help
here.
First make sure you're in the front view. Click on the add
modifier
tool ![]() Next select the scale non uniform tool ![]() Double click on the modifier grid and a parameter dialog will appear. Enter -60 for the bend angle, clock OK, and see the results! It some parts of your plant are stretched way out of shape, it's probably because the modifier wasn't wide enough to include the whole top part of the plant. Click on Build->Modifiers->EffectModifier and the change is permanent.
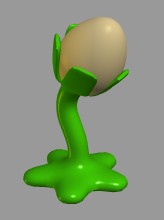
 Now add another bend modifier starting up the stem a bit, and in the general direction that the stem goes, with a bend angle of about 90 degrees. You've now finished the main part of the eggplant! |
Creating the egg
is easy.
Select the sphere tool ![]() Now your sphere is an editable mesh so you can use a modifier on it to scale the tip into more of an egg shape. Add a taper modifier that just covers the entire sphere, bind it to the sphere, and set the taper value to about 0.4 to make an egg. |
![]() |
![]() |
Now all you have
to do is
put them together, and pick some materials. Rotate the egg to the
right and move it into place atop the stem. You might need to
scale
it up or down a bit to make it fit exactly.
To add your materials, select Options->Materials from the menu to show the material panel. Double click on the "New" material and select the stem's properties. Then select the stem and click on the "Apply" button at the top of the material panel. Do the same for the egg. In the example at the left the Brilliance is set to 1.8 to make the purple deeper and richer. This won't show up in the interactive mode, but will in the rendered views. The Roughness is 16 and the Specular weight is 0.4, just so you know. You might want to select both parts and stick 'em together by using the Build->Group menu command. This way they don't get out of position relative to each other as easily as you work. |
To download an Anim8or project containing the model built in the tutorial, and some intermediate snapshots, click here: tutorial_eggplant.zip. |
This page was last updated on Sept. 18, 2007. |
Copyright
2001,
2007 R. Steven Glanville
|