8
You animate the elements of your scene by setting their location, color and size etc. for a few key frames. The computer supplies the remaining values between these keys. You can take more control of how things animate by adding more keys. Besides their basic value some keys have additional properties that you can edit for further control.
A segment is a set of values for the range of frames between two successive keys. You can change how fast things move between key values by editing the properties of segments.
You can also use a script or expression to animate elements. A script is a simple program that computes the a particular value from the frame number or time in seconds, or from the properties of other elements.
You can animate your elements by simply moving them on the screen.
First enable animation by clicking on the animate
![]() [K] button.
Its background turns bright blue
[K] button.
Its background turns bright blue
![]() indicating that you are now animating.
Change to a new frame by clicking on the frame in the time track.
Then select an element and move it to a new location.
Anim8or will add key frames for your element's location for these two frames
and will smoothly fill in the locations for all of the frames between the keys.
When you press the play button
indicating that you are now animating.
Change to a new frame by clicking on the frame in the time track.
Then select an element and move it to a new location.
Anim8or will add key frames for your element's location for these two frames
and will smoothly fill in the locations for all of the frames between the keys.
When you press the play button
 [cr] your element will now move!
You will also notice that a spline path has been added to the scene.
This is the element's path through space.
You can add more points at different frames to build complex motion.
You can also edit the shape of the splines by clicking on the edit spline
![]() [p] button on the toolbar.
[p] button on the toolbar.
Editing objects positions is described in more detail later on. But there are a few things to note:
-
When the animate button is off
 any change that you make will apply to the entire scene.
If you move the camera, for example, it will be moved the same amount it each frame.
When the animate button is on
 changes that you make will only add or change keys for the current frame.
Nearby frames will be smoothly changed to reflect these changes.
- When you move or rotate an element that is a child of another element, then the change will be relative to its parent. The same is true when you rotate an element that is facing its path of movement. The change is relative.
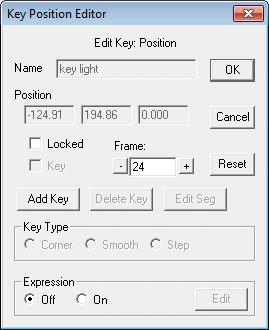
You can edit individual key's values by double clicking on the key in the time track.
Animating with Inverse Kinematics
The Inverse Kinematics tool
![]() [I] allows you to set multiple keys simultaneously.
As described in the Sequences chapter,
you select an IK chain and drag the end effector to make your desired pose.
However the Scene editor has a much more powerful capability.
By locking the location of end effectors, when you move a figure the locked IK chains
will adjust to stay as close to the locked position as possible.
Double clicking on an end effector displays a dialog for locking and unlocking them.
[I] allows you to set multiple keys simultaneously.
As described in the Sequences chapter,
you select an IK chain and drag the end effector to make your desired pose.
However the Scene editor has a much more powerful capability.
By locking the location of end effectors, when you move a figure the locked IK chains
will adjust to stay as close to the locked position as possible.
Double clicking on an end effector displays a dialog for locking and unlocking them.
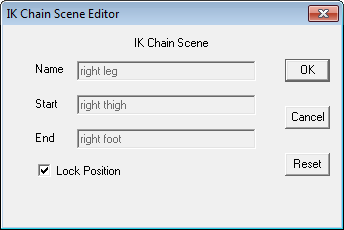
Note: the locked property is animatable so you can change the value through-out a scene.
Below is a simple human figure with IK chains attached to the arms, legs and back. To make the character walk, start in frame 0 and lock both leg chains. The end effectors are shown in red to indicate that they are locked.
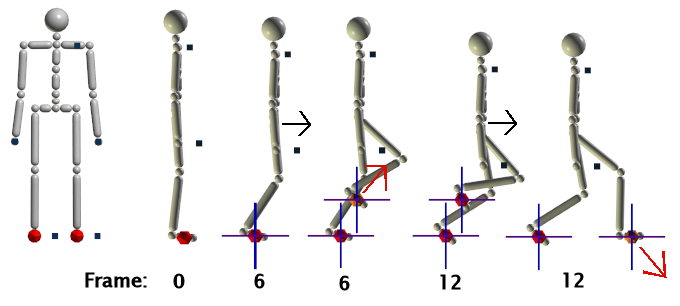
Creating a walk cycle using IK
Change to the Right view and advance to frame 6. Move the character to the right and slightly down. Since both feet are anchored to the ground the knees will bend as shown. Now drag the right foot up and over so that it's under the middle of the character. This is now the key pose for frame 6.
Advance to frame 12 and move the character to the right and down a bit more, then drag the right foot out in front so that it is flat on the ground. Repeat these steps for frames 18 and 24 but moving the left foot and you've created a walk cycle.
You can make adjustments to individual bones if the initial angles aren't what you want. The animation is often smoother if you do this on the same frame that you make keys using IK, but it's not required.
Animation Figures with Sequences
You can also animate a figure by adding an entire sequence of key positions from a sequence. If you make a sequence that is one cycle of a walk you can then add to a scene several times in succession to make a longer walk. Sequences appear are shown in the track bar by <−−−−>. In the track below there is a 12-frame sequence shown for three joints.

Sequences in a scene are linked to the sequence editor. Any changes that you make to a sequence will automatically appear in your scenes. For this reason you cannot modify keys that are part of a sequence in the scene editor. If you try Anim8or will ask if you want to convert that particular reference to the sequence into individual keys and continue. Converting a sequence here will not alter the original sequence, and the link between the sequence and the scene will be lost so that further editing of the sequence will not change these keys in your scene.
Some things can be tedious to animate an action using keys. For example, if you want a light to blink on for a short time every second you could add two keys for every second in your scene. One would set the light's color to its normal "on" value and the other would set it to black so that it would appear off. This is not only time consuming but if you make the Scene longer you must add more keys to the light or it would stop blinking before the end. If you decided that the light should be on for a longer time each flash you would need to move half of the keys.
Anim8or supports a the third way to animate elements, expressions, which makes tasks like this very simple. An expression is basically a small computer program written in Anim8or's scripting language. Each time you change frames Anim8or evaluates these programs with the time or frame number updated to their current value. The expressions then choose a value that's appropriate for that time.
This is a sample controller expression:
$color = (0.8, 0.1, 0.1)*(fract(time) < 0.2);
Used for the color of a light it would cause it to blinks red one a second. Chapter 10 Scripts describes the rules for writing your own expressions.
Controllers manage key values for animation in the scene editor. When you move, rotate, or animate any aspect of an object that uses a key, a controller is created that holds that key. Each one manages only one aspect of the scene. For example one might control the location of an object, and another the color of a light. They contain all the keys regarding that value and any related data.
If an aspect of an object is constant for the scene and not animated then it will not have a controller. The one exception is for bones. They always have a controller for each axis in each joint that can bend. This makes it easier for you to find which bones can move when you are posing a figure.
There are several kinds of controllers. Each uses a different kind of data, or computes in-between values in a different manner, depending on the needs of the property that is animating.
Float |
This is a ordinary number like 10.5 or -150. Like most controllers, in-between values are smoothly interpreted. |
Point3 |
Point3s return 3 numbers per frame. Each value is smoothly interpreted without regards to the others. You use these for positions and RGB colors. |
Orientation |
An orientation controller returns a rotation per frame. They can set the orientation of an object or can be used for a rotational direction. When you edit these values in a dialog you see the PYR (pitch, yaw, roll) equivalent to the orientation. Orientation is more complex that it may seem. Interpreting angles smoothly will not result in smooth rotation of your models. The order in which pitch, yaw and roll are applied is also important. Anim8or uses PYR because by applying roll last you can set it to 0 and you elements will stay "upright". It's often easier for you to just ignore the numeric values for orientation. Simply orient things on the screen and leave the rest to the computer. |
Boolean |
Boolean controllers return a "yes" or "no" value. You would use one for an object's visibility if you wanted it to suddenly disappear. There is no "maybe" value for a Boolean. |
You edit a key by double clicking on its key indicator
 in the track, or by clicking on the
 button for its controller in an element's properties dialog.
|
You can edit a location key's x, y and z values in a key location dialog, and add or delete keys. There are similar dialogs for the other kinds of keys. Entering a frame number lets you move to any frame in your scene, and clicking on the + and - buttons move to the next and previous frames. You can see but not change non-key frame values. The computer supplies them. The Edit Seg button allows you to edit the segment next to the current frame. There are three kinds of keys: corner, smooth and step. Smooth matches the direction and speed that the value changes as it passes through the key. It is what you usually want when you are animating and is the default. Corner keys can have different incoming and outgoing speeds and directions. You would use this where a bouncing ball strikes the ground. Step keys are like corner keys but allows the value to change abruptly. You would use this to make a character suddenly change positions. |
|
To use expressions for a controler instead of keys, click the "on" button in the Expression area.
You edit a controller expression by first opening its Key Position Editor dialog,
enabling expressions with the "on" radio button, and then clicking the
 button in the expression area.
This displays a window in which you can enter and edit the expression.
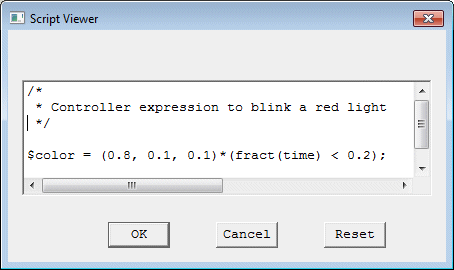
See Chapter 10 Scripts for more details on writing expressions.
You can also edit the controller's for a scene's elements with the Graph Editor. It's displayed in a separate window that you open with the Options→Graph-Editor [Ctrl-P] command. The left panel shows a selected element's name and the names of its controllers. The right panel shows a graph of the controllers' values.
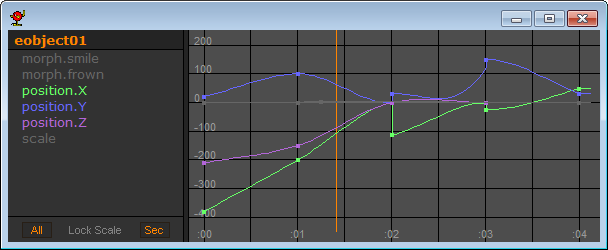
Click on the name of a controller in the left panel to select it. As usual the left mouse button selects a single value, the right button adds to the current selection, and the middle button deselects. Double clicking on a controller's name will display its key editor dialog described above.
Once selected you can edit a controller's keys in the right panel graph view.
Click on a key and manipulator handles
 will appear.
Click and drag your mouse up or down on the center handle or the lines
connecting the handles to adjust a key's value.
Click-drag on the end handles to change the rate that a key's value changes.
The scene will be updated as you adjust the graph so you can see how much you want to adjust a value.
Handles for step keys
 are shown in two colors.
The incoming value is in yellow and the outgoing value in white.
If the graph is too cluttered to see a particular controller
you can hide deselected controller's values by clicking the All button
 off.
You can lock the vertical scale to its current values with the Lock Scale button
 ,
and toggle the labels on the horizontal axis between frames and seconds with the Sec button
 .
.
Orientation controller's may not behave as you'd first expect for several reasons. They wrap at +180 and -180 degrees so the graph can look strange as it crosses from the top to the bottom. Also changing one axis's value can affect the other axis' values. Don't worry, that's just how orientations look when show using the familiar pitch, yaw, and roll of Euler angles.
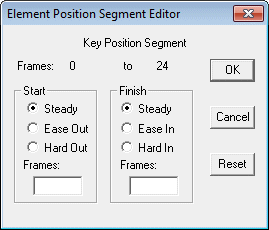
Oops! Segment properties didn't quite make it into this release. These values won't do anything for you ... yet. If I get them working soon I'll make a new release but in the mean time you'll just have to be patient.
|
By default values vary at a consistent rate between keys. But this is not always what you want. How quickly a character reaches full speed when starting to move, or how long it takes to slow down when stopping, are important ele-ments in animation. We normally think of small, lightweight objects as accelerating rapidly to full speed, but large or heavy ones as taking a long time to build up steam. In animation terms something is said to ease out and ease in if it is slow to start and stop. By editing the segment's properties you can change the speed a value changes in several ways. You can set the number of frames that it takes an object to change speeds, size, color, etc. at the start or end of a segment with the ease in and ease out settings. You can also select the opposite: hard out and hard in where you might want an object to accelerate at the end just before it splats into a wall to increase the visual effect. |
 |
