7
The Scene Editor is where you build sets, adding objects and figures, cameras and lights, and construct your final scenes. Everything can be animated; cameras, lights, and characters. And you can save the output as a sequence of still images, or as an .avi movie file. You can even generate stereo views. You enter the Scene Editor from the Mode→Scene command, or by clicking on the Scene tab to the right of the top toolbar..

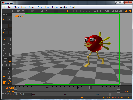
The basic scene editor is shown above. You can configure it to show 4 views (front, top, side, and perspective), a single view from either of these views, an orthographic view, the camera's view, or combinations of 2 or 3 views. The usual menu, toolbar, and status bar are there, and a track bar that shows the current frame.
In addition to the normal select, move, rotate, and scale buttons in the toolbar, there are several more that perform functions specific to the scene editor.
 |
You use the VCR style block of buttons to control the playback of your scenes. They work in the usual fashion. |
 |
The axis [X] button makes a joint's rotational limits and axis visible when you are animating joint positions. |
 |
The show bones [B] button controls the visibility of the bones in your figures. |
 |
You can show or hide your figures' bodies with the figure objects [O] button. This can make editing joints much easier. |
 |
The inverse kinematics [i] enables editing of IK chains. |
 |
The camera [C] button controls the visibility of your camera and lights. They aren't shown in the camera's view, the one that you normally use to render scenes. |
 |
The path [P] button sets the visibility of object's paths. Any object that you select will display its path as an editable spline. |
 |
The key or animate [K] button enables animation. When it's pressed, the changes you make to the location, orientation, size and other aspects of objects in your scene will be animated when you play the scene. |
An element is a part of a scene. A new scene contains two default elements, the world and the camera. The world is the global coordinate system. The location and orientation of everything in a scene is, ultimately, relative to the world. The camera is the viewpoint for the movies you make. You cannot delete either the world or the camera.
Everything that you can add to a scene, including lights, objects, figures, and targets, are also called elements.
You add objects to a scene by selecting the Build→Add-Object command. This brings up a dialog showing all of the objects in your project. Select the one that you want and click OK. It will be added to the center of the scene. This is not the actual object; you cannot edit it from within the scene editor. Instead it is a link to the object. But you can scale the view of it within the scene, and add multiple copies of it. The screen shot of the scene above has three instances of the seaweed object in it.
You will often find it more useful to select world coordinates


 when adding objects to a scene.
They are "dropped" into the scene at the center, at coordinates <0,0,0>, and are selected.
Make sure that the move button
![]() is set, and then you can use the left mouse button to drag the new object around
on the ground plane from within any viewpoint.
The right mouse button will raised and lower it.
You can also scale
is set, and then you can use the left mouse button to drag the new object around
on the ground plane from within any viewpoint.
The right mouse button will raised and lower it.
You can also scale
![]() and rotate
and rotate
![]() an object's size and orientation, and animate them by specifying a series of key frames.
an object's size and orientation, and animate them by specifying a series of key frames.
You add figures in the same manner with the Build→Add-Figure command. They are dropped at the center of the scene. You must move them to their proper place. You can animate the position of figures with key frames, and you can also attach predefined sequences of motion, as described below.
The camera
 is the reference point for the final animation.
It's fully animatable.
You can change its position, field of view, direction, etc.
You can also animate it for any variety of pans, tilts, or dollies.
You can attach a camera to another moving object for fluid tracking shots,
lock a camera's direction on a moving target, and even move right through "solid" objects.
To see what the camera sees, select the View→Camera command.
You can add additional cameras to a scene with the Build→Add-Camera command.
The camera's Active controller sets which camera is currently active.
Double click on a Camera to show its properties dialog to set the Active value or use the animation track.
Don't forget to enable animation with the animate key
![]() if you want your scene to use multiple cameras!
if you want your scene to use multiple cameras!
When you first create a scene, there are two default lights in it. They give the scene an overall level of illumination so that you can see what you are doing. You can't move them about or change their properties. In general you should add your own user lights for better results. When you do the default lights are automatically deleted.
You add lights to a scene with the Build→Add-Light command. This adds a light directly overhead with default properties. Double click on the light to change its color or other attribute, and drag it around the scene to change its position or direction.
Like other kinds of objects, lights are fully animatable, including their color.
There are three kinds of lights that you can use in Anim8or:
 |
Infinite or directional lights cast an even light on all objects in a scene, with all of the rays parallel, like the sun. Close and far things are illuminated with the same level of light. |
 |
Local lights emit light that radiates out in all direction from a particular point in the scene, like the bulb in a lamp. Objects between the camera and the light are backlit, while those behind the light are lit from the front. The further an object is from a local light, the less illumination it receives from that light. |
 |
Spotlights are similar to local lights, but they only illuminate objects that lie within a particular cone. Things in the center are fully illuminated, while things near to the edge of the code are gradually lit with less light. |
Lights do not appear in the final scene, or in any camera view.
If you want an object to appear to emit light,
then you must add a light in the same location as the object.
You can also toggle the visibility of lights in the other views with the show camera
![]() button.
button.
A target
 is a dummy point of reference.
You use them as points of interest for the camera to follow,
or as a parent of a group of objects that you want to move.
They are fully animatable, and do not appear in the final scene.
You add a target with the
Build→Add-Target command.
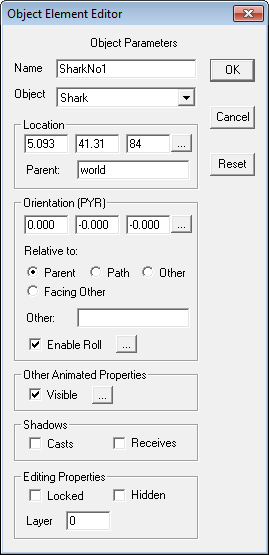
You can edit various properties of any kind of element by double clicking on it. This brings up a dialog similar to the Object Element Editor shown below.
You can animate any value that has a controller button
 next to it, changing its value throughout a scene.
Values with white backgrounds are fixed for the scene.
You can edit them directly in this dialog.
Values that are grayed out are animated.
You edit their values by clicking on the adjacent controller button.
If you want to animate a fixed value, click on the button to add a controller. Controllers are ex-plained in more detail later in this chapter.
There are several common fields to all element types:
Name |
The element's name within this scene. Remember, an object element in a scene is only a reference to the actual object. There can be more than one occurrence of the same actual object in the same scene. If you change the original object in the Object editor then all of the references to it in your scenes will change as well. |
 |
Object |
The actual element's name. You can select any object in your current project with the drop down dialog. |
|
Location |
The location of an object in <x,y,z> coordinates is shown here. This is the location relative to its parent's location and in the coordinate system of the parent. You can animate the location. |
|
Parent |
Any element can have another element for its parent. Then when the parent's position changes the element's position will change as well. With a parent, the location is a relative position. To specify a parent for an element, enter the parent's name in this box. To remove an element's parent entirely, clear the box or use the default world parent. |
|
Orientation |
This value shows you element's orientation in degrees of pitch, yaw, and roll. Pitch is a rotation around the X-axis, yaw the Y-axis, and roll the Z-axis. The values shown are a relative orientation to one of several coordinate systems. It can be either relative to its parent, to its path or direction of movement, to the orientation of another element's, or it can always facing a particular element. You can animate the rela-tive orientation. |
|
Enable Roll |
You can disable an element's roll, keeping it "upright". You normally what to keep your camera upright so by default the camera cannot roll, but everything else can. Enable Roll can be animated. |
|
Visible |
You can also animate the visibility of elements so that they appear or disappear during your scene. |
|
Shadows |
Shadows add realism to your scenes but can be expensive to compute. You can decide which elements cause shadows and which ones show shadows on them. If you want an element to cast a shadow you must enable it with the casts checkbox. If you want it to show shadows check the receives checkbox. |
|
Editing |
The Editing Properties values are useful when editing your scene. You can hide an element by checking the "hide" box or with the Edit→Hide [h] command. This is useful to allow you to see what's behind something, or to simplify a scene for faster drawing. To show a hidden element, either uncheck the "hide" box, or select the Edit→Show-All [H] command. You can lock an element by checking the "locked" box. This prevents any changes to any of its properties within the scene, such as location or orientation. This does not mean that it cannot move. If it is initially animated, it will stay that way. Locking only prevents you from accidentally changing that animation. Note: This does not mean that the element cannot be changed in any way. For example, if it has a parent, then when the parent's location changes, so will the element's position, since its definition of location is relative to the parents. You can also assign a layer to each element for use with the usual layer controls. |
|
These values are only present for certain kinds of elements:
Scale |
An element's size can be animated.
However you do not use a dialog to do it.
Instead you simply select scaling
|
FOV |
You can set and animate the camera's fov or field of view, the angle of the width of the image the camera shows on the screen. Slowly increasing or decreasing the fov zooms the camera out for a wider view or inner for a tighter view. This value is in degrees. |
Color |
You can also animate the color or brightness of a light. |
|
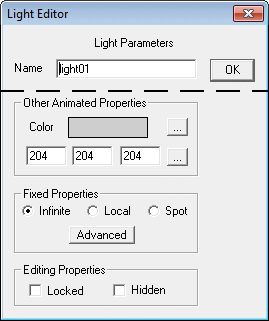
Lights have some unique settings that you can use. You access these from the Light Editor dialog by double clicking on a light.
You change the color of a light by entering the numeric value directly, or by clicking on the
You can change your light into an infinite, local, or spot light in the Fixed Properties area.
To access more advanced settings click on the
|
 |
Advanced Light Properties Dialog
|
You can set several important lighting properties in the Advanced Light Parameters dialog. For local and spotlights you can set limit the light's range. These lights have a steady brightness out to a certain distance called the inner radius. Beyond that distance the light's strength gradually diminishes until at the outer radius and beyond the light has no effect at all. Spotlights are basically cones of light projecting from a point. You can set the angle of this cone as well as how sharply it falls off to the edge. Within the inner angle the spotlight has full brightness. Outside that angle the light's illumination gradually weakens until the outer angle where it had no further effect. |
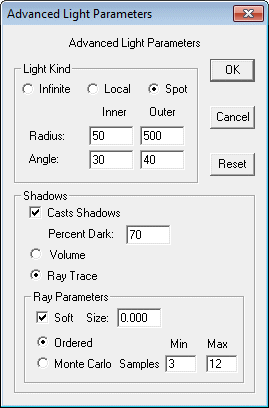 |
By default lights do not cast shadows. You enable shadow casting by checking a light's casts shadows checkbox.
Shadows in the real world are not totally dark. Some light is scattered off of nearby objects into these areas. You can illuminate the shadows in Anim8or as well with the percent dark parameter. This only allows diffuse light into shadows so that there are no shiny highlights, which would appear unrealistic.
There are two main kinds of shadows, volume and ray traced. You select which kind you want you light to cast in this dialog. Ray traced shadows can cast soft edges. You control how soft the shadow is with the size parameter. For infinite lights this is the angle that the shadow spreads from the edge of an object. For local and spotlights this is the physical size of the light. Objects closer to these lights will cast softer shadows than those further away.
You can set the minimum and maximum number of samples used to calculate soft shadows in this dialog as well.
The section on Shadows has more information on using shadows.
Shadows are a very important part of an image. They can also consume an enormous amount of computer time. It's important that you understand how they work or you may spend a lot of unecessary time waiting for your images to render.
Shadows are only visible in rendered images made from the Scene editor. They are only cast from light that you add yourself. And they are only cast by object that you choose. To enable shadows you need to:
- Use the Scene Editor,
- Add your own light and enable the casts shadows in the advanced properties dialog,
- Enable casts shadows and receives shadows on the element of your scene that you want to show shadows, and
- Render an image or a movie
Volume shadows are usually much faster to render than ray traced shadows but they have some limitations. They have hard edges and you cannot use them to cast soft shadows. This tends to make your images look unrealistic.
A bigger limitation is that you cannot use volume shadows to cast shadows from within an enclosed object such as a jack-o-lantern. While this is not a problem in most scenes it can cause you some unwanted "surprises" if one of your lights moves into an area enclosed by a single object. You can work around this problem by splitting the object into two or more pieces, or by using a ray-traced shadow for the offending light.
Ray traced shadows are the most versatile. They can also consume a very substantial amount of time to render.
Ray traced shadows can be either hard or soft. Hard shadows have a very distinct boundary between what is inside the shadow and what is outside. Your shadow form the sun on the ground is an example of a hard shadow.
Soft shadows don't have a distinct boundary. Instead the amount of light gradually lessens until the shadow reaches its maximum darkness. The shadow cast by a florescent light is an example of a soft shadow. Such shadows are soft because the apparent size of the light casting them is large. As you can see below soft shadows can be much more realistic.
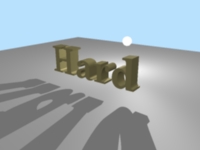
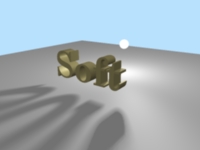
Soft shadows are costly to computer. Many individual shadow samples are used to make a soft shadow. Anim8or therefore limits soft shadows to anti-aliased images where multiple image samples are used for each pixel. High quality soft shadows often require even more samples than Anim8or uses for anti-aliasing. To limit the total cost of these computations, Anim8or adapts the number of samples to the image as it is being rendered. If there is nothing "interesting" in an area then only a few samples are taken. If a shadow edge is detected, however, more samples are taken to improve the image. You can set the minimum and maximum number of samples used for each light in the Advanced Light Properties dialog.
In general, you will need to set the number of samples higher for larger sized lights that cast soft shadows. You will also have to increase the number when a light is very close to an object since this will magnify its shadow's soft part.
You can use the Environment Settings dialog to control several things in your scenes. You can add a background image. It can be either a fixed image or a panorama that moves with the camera pans. You can also add fog effects. You open this with the "Environment" button in the Scene→Properties command.
|
In the background area you can set the background for your scene several ways.
By default it is a solid color.
You can change the color with the
You can also use a fixed image for the background.
To do this select the "image" button and load a background image from a file with the
You can also use an image as a panorama. The image is wrapped around your scene in a big arc. When the camera moves it will pan across the background. The diagram below shows how this works. You set the area that your background fills in the Panorama Angle area. You have to be careful not to aim the camera past the edge of the panorama or the background color will show. You can also use full 360 degree VR backgrounds. For these you need to set the angle limits to -180 to 180, and -90 to 90. There are two common projections for VR images, linear and Lambert. Lambert is used more often for scientific work because it has approximately the same solid angle for each pixel. If the background is distorted when the camera is pointing straight up or down try changing the Lambert check-box. You can remove the default ground grid from your scene by un-checking the Ground Grid box. Distant fog can add realism to your scenes. It is useful for underwater shots as well as distant outdoor views. You enable for by checking the box at the top of the fog section of the Environment dialog. You can set the color, the distance from the camera at which fog begins to appear, and the distance beyond which it has maximum saturation. You can also limit the maximum effect it has so that things don't disappear entirely in the distance. |

|
Shadow bias is an advanced technique used to hide ugly rendering artifacts that can appear when shadows are used. These artifacts are caused because the lighting computations assume that your models have smoothly curved surfaces. In reality they are made of flat faces. Shadow computations are based on these flat faces and don't always get along with the lighting computations.
To overcome this discrepancy, a shadow bias is used to push shadows slightly back away from the viewer. Then everything looks fine.
You normally shouldn't have to change the shadow bias.
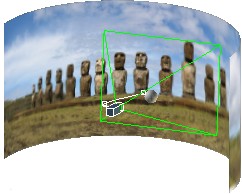
Panarama Environmental Image
Note: Backgrounds only appear in the Camera view.
At the bottom of the window is the scene's time track. If it isn't visible on the screen, select the Options→Track-Window command:

On the left is the scene's title.
It is the top of a tree description of the elements that make up your scene.
If you click on the "open" box
 you can expand the window to show the objects contained in the scene.
You can change height of the expanded track window by dragging the horizontal resize bar
 up or down, and the width of the name field by dragging the vertical resize bar
 to the right or left.
The right part of the track is a time line for the scene. If you click on it, the display will switch to the time you selected. Each tick mark represents one frame. Seconds are marked with full vertical lines. Normally there are 24 frames/second but you can change this to other frame rates with the View→Preferences dialog. The current frame is highlighted in dark gray.
You can click and drag the mouse it will select a range of frames. Use Shift-Click to select a new frame range while still keeping the same current frame.
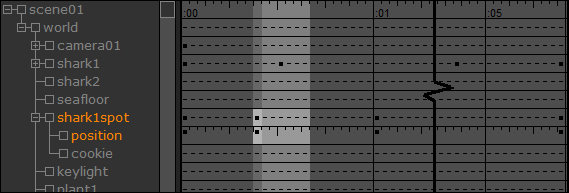
When expanded, the left part of the track shows the objects in your scene.
There is a lot of useful information here.
You can see what an object's parent is,
what properties have been animated, which bones can be rotated, and such.
In the view above the highlighted object shark1spot's parent is the world.
Its location is animated and it has a child object called cookie.
If you see an "open" box
 by an item then it has more information that you can display by clicking on the box.
You can select and edit items shown in the name section of the track by clicking and double clicking on them. Mouse buttons have their normal meanings with the right one adding to the selection and the middle one subtracting. Double clicking is how you can edit the numeric value of animated properties like an element scale that does not appear in a dialog.
|
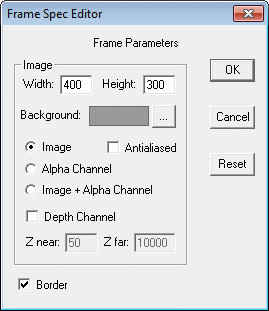
You can preview a software rendered image of any view with the File→Preview command. You can set the size and background color used to make the image, and can choose to make it anti-aliased. You can also use the Render→Render-Image command to do this in the Scene Editor. |
 |
When you render an image, you can isolate the elements in your scene from the background. You can save both the images of your elements and a mask showing where they are. This mask is called an alpha channel. It's really nothing more that a black-and-white image in the shape of your elements. It has a value of 0 where your elements are drawn, and 1 where they aren't. Transparent parts and edges in anti-aliased images will have a value in-between representing how much of the pixel your elements "own". You can use the alpha channel to combine images made in Anim8or with other images in a paint-program, as you will see below.
You make an alpha channel by selecting the "Alpha Channel" button in the preview dialog.
You can also make two very useful images with one rendering by selecting the "Image + Alpha Channel" button. One is an ordinary alpha channel and the other is a special element image that has been pre-multiplied by the alpha channel. It shows your elements normally but is black where your elements are not. Partially transparent parts of your elements are dimmed to the degree that they are transparent. You can then use these two images for a variety of special effects, such as image compositing which is described next.
With image compositing you can insert a computer generated model into an ordinary photograph or movie, or computer generated ones. You first render an "Image + Alpha Channel" image and then use a paint program such as Adobe Photoshop to add Anim8or's output to the photo. The steps in this process are shown below. It's best to enable anti-aliasing to prevent annoying jaggies in the result.
|
Step 1: Render an "Image + Alpha Channel" of your model in Anim8or. The result is two images as shown here: |
||||
 |
→ |  |
& |  |
Camera view in Anim8or |
Pre-multiplied by Alpha |
Alpha Channel |
||
|
Step 2: In a paint program, multiply the photographic image by the alpha channel image. This will mask out a hole in the photo for your model: |
||||
 |
× |  |
→ |  |
Photograph |
Alpha Channel |
Masked Photograph |
||
|
Step 3: Still in the paint program, add the Anim8or image to previous result: |
||||
 |
+ |  |
& |  |
Masked Photograph |
Pre-multiplied by Alpha |
Final Composite |
||
It's important to try and match the lighting on your model to that in the photo. Otherwise the computer generated part won't blend in very well. In this example the bobcat is lit by the sun from behind and to the right but the bird has some front lighting as well which makes it look artificial. (You would think it was a real bird otherwise, right?)
To render an .avi movie, display the camera's view on the screen with View→Camera, and then select Render→Render-Movie. Select AVI and any other settings you prefer, and Anim8or will render your movie.
If your graphics card supports advanced shaders you may choose to use an alternate OpenGL renderer that uses the graphics accelerator in your computer to make images and movies. This renderer is much faster than the default Scanline renderer but it does not support all of Anim8or's options. Most notably, shadows are not supported.
Anim8or also has a built-in ray tracer renderer called ART for Anim8or Ray Tracer. See Chapter 11: Art Ray Tracer for more details.
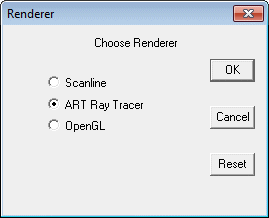
You choose the renderer in the Render→Renderer dialog. If the "OpenGL" entry is not present Anim8or cannot render using your computer's graphics hardware.
 button.
 button.