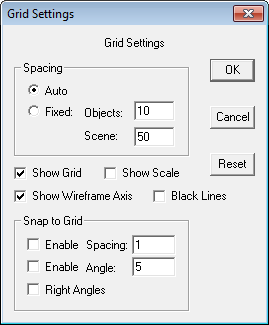
2
Anim8or requires the use of a mouse with two buttons, but using one with a middle button can simplify some commands. You use the left one most of the time to select, move, and change objects. When selecting, the left button always deselects everything beforehand, so that only a single item remains selected. The right button, on the other hand, allows you to select multiple items by adding newly selected ones to those already selected. You can use the middle button to deselect specific objects. If you don't have a middle button some operations will require a few more steps.
When moving, rotating, or scaling something non-uniformly, the left button changes the X-axis and Y-axis. Moving to the left or right affect the X-axis, and up and down the Y. The right button changes the Z-axis.
You can usually double click on something to bring up a dialog to view and edit edit its properties.
Many tools and commands are associated with keyboard shortcuts or hot keys. These are shown in this manual enclosed by square brackets [L] next to the button or command. You can press this key instead of clicking on a button or selecting a command from the menu. They are summarized in Appendix A: Keyboard Shortcuts.
Anim8or has a complete undo command for the Object, Figure, Sequence and Scene Editors. As long as you stay in either Editor you can undo and redo multiple editing commands. A history is kept of as many changes as can fit in the undo buffer, initially set to about 25 MB of memory. You can increase this in the Configuration dialog. So unless you're editing large models, you will be able to undo more than one operation.
You use the Edit→Undo and
Edit→Redo
menu commands to apply undo's and redo's.
Or you can use the top toolbar buttons
 [Ctrl-Z] and
 [Ctrl-Y].
If you wish to cancel a currently active operation, such as if you are dragging the mouse to change an Object's orientation, you can still use the original (rather simplistic) substitute. When you are dragging a mouse in the main window to change something, say an object's orientation, and you think "Oops! I didn't want to do that!" just keep on dragging the mouse until it's outside the active view window and release the button. This will cancel the operation.
Still, when using this and any other computer program, I still offer the same advice: "Save Early, Save Often!" And don't always save to the same file. Keep a recent backup handy.
You can turn tool tips on with the Options→ToolTips menu command. Then if you pause the mouse cursor over a toolbar button it function will be shown in the status bar.
 |
Here is a portion of a typical toolbar.
It has several sections in it that control different aspects of its behavior.
The first thing that you will notice is that markings on some of the buttons are in
ORANGE |
The topmost group can have up to 4 buttons in it. When you click on one it sets the indicated mode, and changes the lower part of the toolbar to show the functions that are present in the new mode. The different modes are:
 |
[A] This button indicates that you are in the most basic select-and-edit mode for the editor that you are currently using. You will use it for most operations, such as selecting things and common editing actions. |
 |
[V] This button is used for changing your view or views of your workspace. With it you can pan, zoom, tilt, and scale each view independently. |
 |
[O] In this mode you can move and rotate the pivot for objects in your workspace. A pivot is the point and orientation that are used when you scale and rotate each object. |
 |
[P] You use this button to move into point edit mode. It allows you to add, move, and modify individual points, edges, and faces of editable mesh objects. |
The next row of three small buttons


 shows the three axes of the 3D world.
They indicate which axes are "unlocked",
allowing you to move and rotate things in each direction.
You can individually select or deselect them,
and thus restrict the movement of objects that you are changing.
Below these buttons you will find three more small buttons


 of which only one can be active at a time.
They show the current coordinate system you are using.
You can use world, object, or screen coordinates when you manipulate things.
You will find that there are several common toolbar buttons that have the same or similar meanings in more than one editing mode. They are described next.
 |
Select [a] - You use the arrow button to select individual components. In this mode clicking on an object with the left mouse button selects it and deselects previously selected objects. Right-clicking selects additional objects without deselecting currently selected ones. Tip: holding down the Ctrl key then pressing the mouse button allows you to select multiple objects using the mouse as a sort of paintbrush. |
 |
Drag-Select [d] - With this button you can click and drag to show the corners of a selection rectangle. Any and all objects that fall within that area are then selected. Again, the left mouse deselects any previously selection items, while the right mouse does not. |
 |
Move [m] - This is the move function. You set it when you want to move your objects around on the screen. When you press the left mouse button within a view window you can drag anything that is currently selected in the X and Y directions by moving the mouse to the left and right, or up and down. The objects will move along with your mouse. Similarly, the right mouse button will move them along the Z-axis, which is usually into the screen. |
 |
Rotate [r] - This is the rotate button, used for rotating things. When you click and drag the left mouse button, any selected objects will rotate around the X and Y-axes along with your mouse. You can use the right button to rotate them around the Z-axis. |
 |
Non-unifrom Scale [n] - This is the non-uniform scaling button. With it you can scale most objects independently in the X any Y directions using the left mouse button, and in the Z direction with the right mouse button. |
 |
Scale [s] - This button scales objects in all dimensions simultaneously. |
|
In the Sequence and Scene editors there is set of buttons for controlling the playback of your animations. You use its buttons in the same manner as those on a video player. |
 |
This is a toolbar that's at the top of the window. You can use it for several tasks common throughout Anim8or.

The buttons on the top toolbar do the following things:
 |
Undo [Ctrl-Z] - If this button is enabled you can use it to undo the most recent edit command. |
 |
Redo [Ctrl-Y] - Reapply a command that you have un-done. |
 |
Cut [Ctrl-X] - Deletes any selected components and places them on the clipboard. |
 |
Wireframe [Ctrl-W] - Changes the currently active view of your object to Wireframe. |
 |
Flat [Ctrl-F] - Changes the view to Flat or Faceted. |
 |
Smooth [Ctrl-S] - View objects as smooth. |
 |
Material [Ctrl-M] - Toggles the display of the Material toolbar. |
 |
Arc Rotate [Ctrl-R] - Enables the Arc Rotate tool. You can easily pan, zoom, and rotate any view with Arc Rotate. It is described in the next section. |
 |
Snap to Grid [Ctrl-G] - You can toggle Snap to Grid mode with this button. |
 |
Fast Select [Ctrl-T] - When this is enabled you can click on unselected objects and immedi-ately edit them. Experienced users often prefer this mode because it allows faster editing, while newer users find it easier to first select, and then edit things. |
 |
List Items [Ctrl-L] - This button will open a text window listing the objects in the current view. You can click on them individually by name to select or deselect them. |
 |
Graph Editor [Ctrl-P] - This button will open a window with a graphical view on the keys in your Scene or Sequence. You can use the mouse to edit keys here. |
 |
CAD Notations [Ctrl-D] - Displays additional measurement notations on the selected object. |
   |
Layers - There are 8 editing layers which can be locked or hidden. You can as-sign individual components to any one of the 8 layers. Clicking on the layer button toggles that layer's visibility. If the button for the layer is grayed out then it is hidden, and dark gray layers don't contain anything. Right-clicking locks and unlocks a layer, indicated by a small lock next to the number. Objects in locked layers are visible but you cannot select or edit them. |
The right portion of the top toolbar has four buttons that allow you to quickly switch between different editors:

You can also use Shift+RightArrow and Shift+LeftArrow to move between editors.
|
When you press and hold the Alt button
Anim8or temporarily enters arc rotate mode and
displays a special overlay over the focus window.
You can then use the mouse to pan, scale and rotate your view.
It may take you a try or two to get used to how it works,
but once you have it can save you a lot of time over other methods.
You can also toggle arc rotate by clicking on the arc rotate button
|
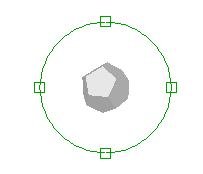 |
To the right is a view of the arc rotate screen. There are six different regions on the screen, separated by the green overlay: the inner, outer, top and bottom, and left and right. Each behaves differently when you click your mouse in them, and each mouse button controls a different function.
- Left button - Rotate the view. Clicking in the center rotates it around the X and Y-axes. The outer region rotates around the Z-axis. Clicking inside one of the four little squares rotates in the X-axis (for the top and bottom) or the Y-axis (for the left and right) only.
- Right button - Dolly the view. The center area moves your view left and right, and the outer region moves into and out of the screen. You may not see any change when dollying into the screen in orthogonal views but they will be apparent in a perspective view.
- Middle button - Scale the view. The different areas all behave the same when you are scaling a view.
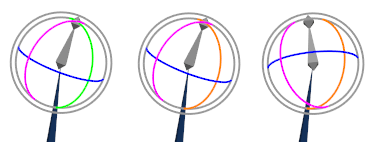
New to version 1.0 of Anim8or, widgets are on-screen controls that both simplify and offer better control of changes you make. Shown below is a trackball that is used to rotate bones around individual axes. The colored arcs show you which rotations are available. Green represents a rotation around the X-axis, blue the Y-axis, and magenta the Z-axis. Moving the mouse over the highlights the available controls.
The material editor is used whenever you need to design the color, texture, transparency, and other visual properties of an objects appearance. An example is shown below:
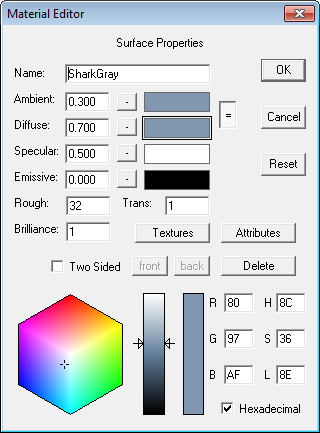
Materials are a complex topic. This dialog has are several sub-dialogs for certain functions. See Chapter 9: Materials for more details on how to use the Material dialogs.
You can use any Anim8or .an8 project file as a library. Objects, Figures, Sequences, and Scenes can all be imported to another Anim8or project with the Object→Import, Figure→Import, etc. menu commands. You can also export individual Objects and such with similar Object→Export commands. Make sure to select the .an8 file type.
You can control the quality of the images shown when you edit, as well as the quality of the images output to files. These are controlled through the Viewport Preferences dialog that is found under the View→Preferences menu command. It looks like:
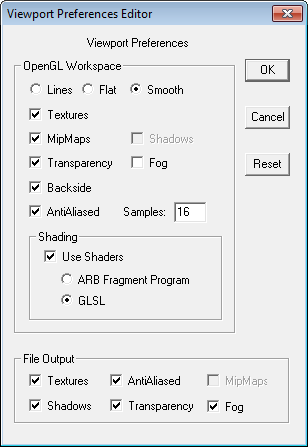
This section controls the appearance of your interactive workspace. You can view your objects as wireframe models, as flat faceted solid objects, or as smooth shaded solid objects.
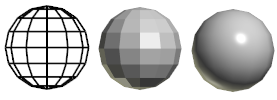
Most graphics cards display smooth shaded images at the same speed as flat shaded ones, so you might think that flat shading wouldn't be very useful. But it is sometimes helpful to see individual facets on a model.
Texturing, and mipmaps, can sometimes slow the response of your computer, so use the check boxes to enable or disable them as you see fit. Also, texturing can hide the structure of your models, so you don't always want to see it.
You can add a general fog to Anim8or Scenes. Objects beyond a certain distance gradually fade into the color of the fog. Fog is only visible in the camera view of the Scene editor.
Most computers support anti-aliased 3D graphics directly in hardware. Checking this box changes the display to use that mode. You may need to restart Anim8or for to be effective.
The Use Shaders check box enables drawing higher quality materials in the working views. It is available only on computers that support OpenGL pixel shaders. Graphics cards that support DX9 or higher will usually work. If your graphics card doesn't have this feature the check box will be disabled.
This section controls the appearance of your interactive workspace. High quality images are rendered using a software renderer or a ray tracer instead of an OpenGL accelerator, so the speed of your file renderings can be affected quite severely by the settings that you choose.
Anti-aliasing helps to remove jaggies but takes several times longer to do.
You can add your own unique numeric and non-numeric properties called attributes to your models, materials, characters, etc. Attributes are animatable. While they are primarily useful in scripts, they are quite flexible and are sometimes used to help develop new features for Anim8or. Attributes are saved in the .an8 output files so they can also be used to share data with auxiliary programs that read the .an8 format. See Chapter 10 - Scripts for more details on attributes.
Saving Images as .jpg, .png and .bmp Files
You can make a quick preview image of any view that you are working on with the File→Render-Preview command. You can also save this image to a .jpg, .png, or .bmp file, or print it, from within this command.
Anim8or has the usual Print and Print Preview options in the File menu. But it offers one additional level of control of your printed images, by letting you control the size and other properties of the bitmap image used in printing. It is not at all uncommon for a color printer to have a resolution of 1440 by 720 dpi. But generating an 8.5" by 11" image at this resolution is not practical! Instead Anim8or uses a default size of 1024x768 which you can adjust to suit your needs.
There is an Auto Save feature in Anim8or that will save a backup copy of your project at regular intervals when the project has been modified. You can set the interval, which defaults to 5 minutes, in the File→Configure dialog.
The name of the file is _autosave00000000.an8 or something similar. You can set the directory that the back-up file is written to as well. The default is the current working directory.
Anim8or does not automatically try to restore the file after a crash, or notify you that one exists. But remember to look for one when you've had a problem.
Anim8or keeps track of several base working directories. One is used to store Anim8or project files (.an8) and the others are the default directories for keeping textures, importing and exporting objects, saving pictures, and to store scripts which you can use to customize Anim8or in various ways. You set these directories with the Configuration dialog through the File→Configure command:
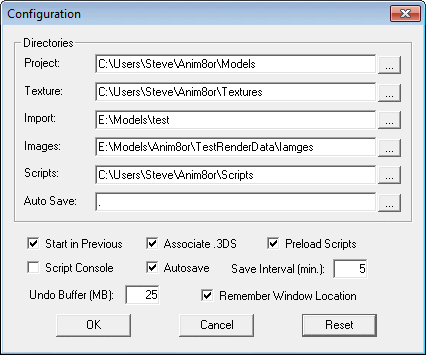
When you load or save a project file Anim8or uses the project directory as the initial default. You can change this directory in the Configuration dialog.
When you load a project file, Anim8or looks for texture files in three directories. First it looks in the same directory as the .an8 file. If that fails it tries the Texture directory set in the Configuration dialog. As a last resort Anim8or uses the full path name stored in the project file, which is where the texture file was initially found.
The import directory is simply the default place for importing and exporting files of any format.
The images directory if the default location for saving any images or movies that you render.
The scripts directory is where Anim8or looks for scripts to preload. This is where you keep plug-ins as well since they are scripts. Scripts are only preloaded if the Preload Scripts box is checked.
You can have Anim8or automatically load the last project you were using by checking the "Start in Previous" box.
You can enable Auto Save by checking the box labeled accordingly and set the time interval of the saves.
If you check the Associate .3DS box then you will be able to start Anim8or by double clicking on .3ds files in Windows.
You can change certain aspects of the way that the Anim8or working views look with the User Interface Configuration dialog. You can find it under the File→Configure-UI command:
Most entries have obvious meanings but you might need an explanation for a few of them.
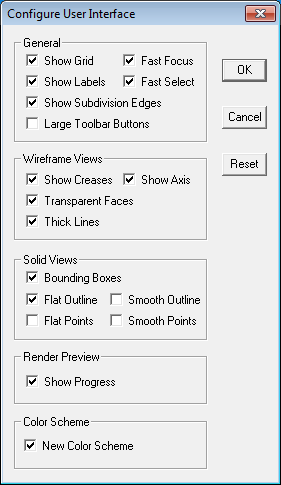 |
Fast Focus only applies when you have multiple working views visible at the same time. It controls what happens when you click inside a window other than the one with the mouse focus. If fast focus is enabled then the current active editing command will be applied to the new window on the first click. So if you are in Select mode then any object you click on in the new window will be immediately selected. If fast focus is disabled then the first click will only change the focus window. You will have to click a second time to select something. |
|
Fast Select allows you to both select and edit components with a single mouse click. It can be somewhat difficult to use for newcomers to Anim8or. If you disable Fast Select you will generally need to change to one of the select tools to select components, and then back to the tool you want to use, but you are unlikely to accidentally deselect your work by mistake. You can also hold down the Shift+Ctrl keys to temporarily switch to Arrow-Select mode. |
|
|
Large Tool Buttons increases the size of the buttons in the toolbars. Users that have a touch screen often find this helpful. |
|
|
Transparent Faces in the Wireframe Views section controls the drawing of a thin, transparent skin on the faces of a model in wireframe viewing mode. This is on by default but you may sometimes find it easier to edit a particular mesh with it disabled. |
|
|
You can show the wireframe outline or the vertex points overlaid on your solid models in both the flat and smooth viewing modes by checking the appropriate boxes in the Solid Views area. You may find that showing all this information can slow your computer down, especially if you are editing complex models, or make your model difficult to see. If this happens try disabling these features to improve performance. |
|
|
Thick Lines. On very high resolution screens the lines used to show mesh edges and control structures can be difficult to see. Enabling Thick Lines changes makes them wider and easier to see. Enabling anti-aliased viewports as well can dramatically improve the appearance of the 3D workspace. |
|
|
You can show the wireframe outline or the vertex points overlaid on your solid models in both the flat and smooth viewing modes by checking the appropriate boxes in the Solid Views area. You may find that showing all this in-formation can slow your computer down, especially if you are editing com-plex models, or make your model difficult to see. If this happens try disabling these features to improve performance. |
|
|
When you render an image Anim8or normally updates the screen to show the progress of the render. Some graphics cards are very slow when updating the screen and this can increase the time it takes to render an image considerably. You can disable these partial image updates by unchecking the Show Progress box in the Render Preview section. Anim8or will still display a progress bar so you will still see how far the render has progressed. The final image will still be displayed when it is finished. |
|
 ,
and a few are in DARK GRAY
  .
The orange ones indicate that the associated mode or option is currently selected or in effect.
The gray ones indicate a state that is not selected.
The dark gray buttons show options that are disabled.
